

By Steve Bain
The applications and features described in this tutorial require CorelDRAW Graphics Suite X3 or newer to be installed.
If you have used a previous version of CorelDRAW to create designs or illustrations destined for print reproduction, you probably know that you can use various overprinting options. In case you haven't heard, however, CorelDRAW features an enhanced view that displays live overprinting results. With this new feature, you can check your overprinted colors on-screen before proofing or printing your work. It's another of those neat features that you won't see in most other graphics programs. Let's take a closer look at some of the benefits this new feature gives you.
Activating and viewing overprints
Typically, when you print from CorelDRAW, the nonvisible portions of objects layered behind other objects are removed - an occurrence called a knockout. This happens automatically and behind the scenes, in conformity with established digital printing standards. If you want, you can preserve the areas layered behind the fill, or outline portions of the foreground object, so that the colors are overlaid. In simplistic terms, this technique overlays one color onto another and is commonly referred to as overprinting.
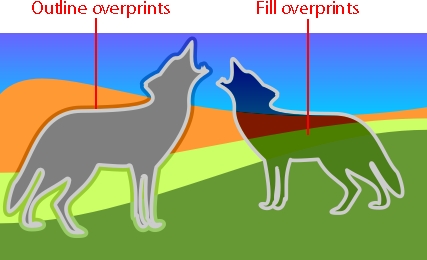
In previous versions of CorelDRAW, you could apply overprints to your object fill or outline so that the colors overprinted any underlying colors, but doing so often required a little imagination (and memory work) to keep track of what you overprinted. With CorelDRAW, you can now see how overprinted colors are affected on-screen. In the example shown below, two silhouetted images feature the same light-gray outline and a dark-gray fill on a multicolored background. The outline applied to the silhouette on the left, and the fill applied to the silhouette on the right, are set to overprint.
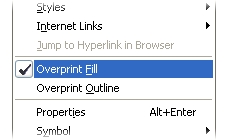
To activate overprinting, right-click any object shape, and choose Overprint Outline or Overprint Fill from the pop-up menu (see below). A check mark next to the menu option indicates that the overprinting mode has been activated. (If either option is unavailable, check whether a fill color or outline width property has been applied to your selected object.)
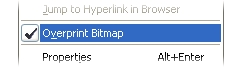
If the object you select is a bitmap, the Overprint Bitmap option is available, as shown below. In this case, only the area occupied by the bitmap shape can be overprinted, so both the bitmap area and the shape of its clipping path are handled as a single unit.
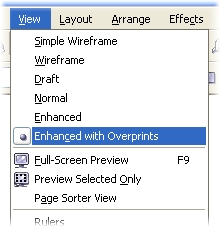
After you apply your overprinting options, you can view the color results by using the Enhanced with Overprints previewing mode, which is a new feature in CorelDRAW. To choose this view mode (the application default), choose View > Enhanced with Overprints, as shown below. When the view mode is activated, any color shifts caused by the overprinted colors become visible. CorelDRAW uses your current color management settings to simulate the overprint colors.
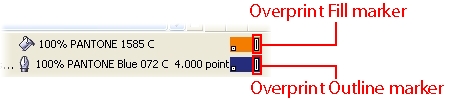
While overprint options are applied to an object, the status bar displays an overprint indication symbol in the Fill Color and Outline Color indicators (see below) whenever you use the Pick or Shape tools to select the object.
Overprinting vs. trapping
In certain printing operations, the overprinted inks can help reduce gaps caused by misaligned color plates where two or more colors meet. You can use the overprinted inks to manually apply a rudimentary color-trapping effect. For example, in the illustration below, an outline set to overprint is applied to a character shape to eliminate the likelihood of a visible gap.

In traditional printing, trapping is a complex process in which the physical areas where color inks meet are expanded to overlap into adjacent areas of color. Traditional trapping is much more complex than simply applying an overprint effectit essentially eliminates the printing inaccuracies due to misaligned inks.
At rap is created when an expansion is added around a color area that is adjacent to another color area. Shapes of different colors are trapped in a direction from the lighter color to the darker color so that the two shapes slightly overlap.
The process involves two basic techniques to trap the ink areas: choking and spreading. A spread is created when a lighter-colored shape is positioned in front of a darker-colored shape. Portions are added to the edges of the lighter-colored shape in order to spread into the darker color, as shown below.
A choke is created when a darker-colored shape is positioned in the foreground and a lighter-colored shape is in the background. The lighter background is choked where the two colors meet, meaning that the lighter background's edges overlap into the darker shape's edges (see below).
Part of this trapping process involves the overprinting of one ink by another. So, by manually applying trapping to the outline or to the fill property of an object, or to both, you can create a trapping effect of sorts.
Increasing your color range
In general, overprinting creates a situation in which an ink color is printed over one or more other ink colors. If the inks are opaque, the overprinted ink colors are unaffected.
If the ink colors are translucent (as most are), new colors are created where the inks are overprinted, which can be an enormous benefit for designers or illustrators trying to maximize their color opportunities on a tight budget.
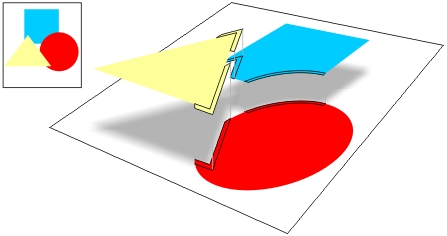
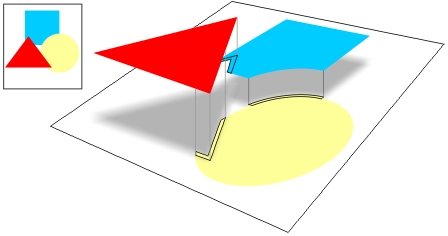
If you're working within a limited printing budget, overprinting can expand your freedom in designing by offering new color opportunities. By overprinting translucent inks, you can create new color variations. You can take advantage of this relatively simple strategy by applying basic color-mixing skills. For example, mixing translucent blue and yellow ink colors produces green, blue mixed with red produces purple, yellow mixed with red produces orange, and so on (see below).

To gain even more mileage from your ink selection, you can increase the color variations by overprinting color tints or fountain fills of your ink colors, or both (see below).

As mentioned earlier, the hidden portions of objects in your document are typically removed at print time. This printing method is the default condition, provided no other printing overrides or trapping options have been selected during printing.
Overprinting and trapping are somewhat intertwined, so you'll see overprint options peppered throughout the printing and export options of CorelDRAW. For example, the EPS export, Publish to PDF, bitmap and duo tone conversion, and separation printing features all include options specific to overprinting. Let's examine how overprint options applied to objects in your drawing can affect your printed output.
The three basic levels of overprinting, listed in a hierarchy from highest to lowest, are separation overprints, trapping overprints, and document overprints. A higher-level setting generally overrides a lower-level setting.
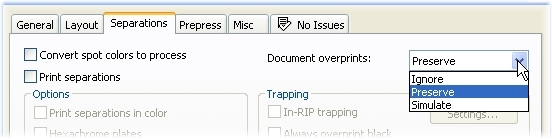
Overprint options for specific document objects are referred to as document overprints and constitute the lowest level of overprinting. If you want, you can choose from a menu selection of Document Overprint options on the Separations page of the Print dialog box (see below) to preserve (the default) or ignore the overprint options you've applied. To correct the overprint colors by applying the current color profile of your separations printer when printing, you can choose the Simulate option.
At the next level, the trapping options become available, provided that you are printing to an Adobe PostScript-compatible printer and that the Print Separations option is selected on the Separations page of the Print dialog box (see below). Trapping options enable you to use auto-spreading to apply automatic overprinting to text or objects, or both. Choosing Always overprint black causes all text and objects colored black to overprint all underlying object colors.
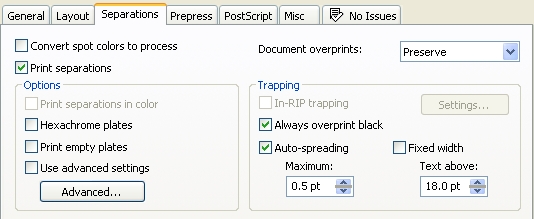
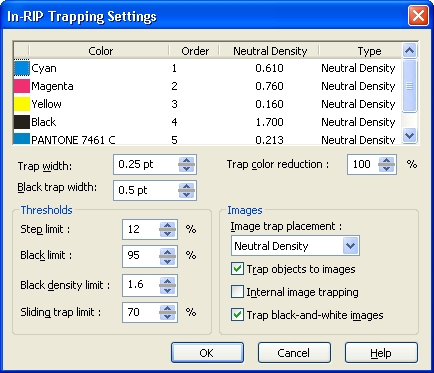
Choosing the Auto-spreading option activates further options for choosing specific spread values for text and objects. If your separations printer is equipped with its own trapping software, the In-RIP trapping option is available, enabling you to set specific trapping options for your printed output. Clicking the Settings button provides access to a dialog box that features a complex set of overprinting and trapping-specific options (see below).
At the highest level, you can also choose to overprint separation ink colors by using the overprint options in the separation inks list (see below). For these options to become available, you need to use a PostScript printer and then choose the Print separations and Use advanced settings options on the Separations page of the Print dialog box. You can activate overprinting at this level by clicking the Advanced button to open the Advanced Separations Settings dialog box (see below), or by clicking directly in the ink list on the Separations page of the Print dialog box.
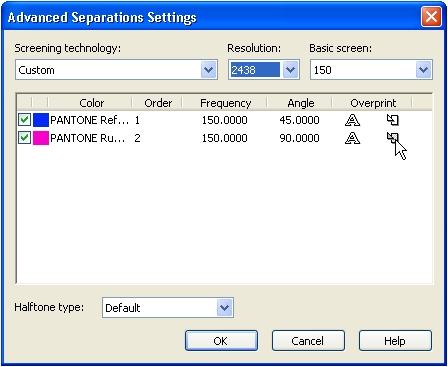
Click directly on the symbols adjacent to the ink color in the list to cause the ink color to overprint all underlying colors for text (A icon) or graphics (the shapes icon), or both. Each option toggles on or off when clicked.
Our exploration of overprinting has shown you how to apply overprints. CorelDRAW enables you to view overprints on-screen without having to rely entirely on your imagination to evaluate the effects. Although the interrelated subject of trapping is more complex than what was covered here, you now know how to benefit from overprinting and how to choose options to control the overprints applied. For details on this complex subject, your best bet is to investigate the improved reference documentation in the Help in CorelDRAW (see the section "Working with color trapping and overprinting"). The Help provides detailed information about the trapping options available throughout the application.
Steve Bainis an award-winning illustrator and designer, and an author of nearly a dozen books, including CorelDRAW: The Official Guide.
Was this article helpful?
Tell us how we can improve it.